Promote communication within organization using Feeds
Updated in June-2023
Having a social network in an organization is crucial for building positive relationships, fostering teamwork, and creating a sense of community among employees. It improves communication, knowledge sharing, and employee engagement, leading to better retention and job satisfaction. A strong social network attracts top talent, facilitates professional growth, and enhances the organization's reputation.
The Feeds page in the greytHR Admin portal allows you to communicate in your organization network with your employees and colleagues. The rich and healthy communication environment created by our feeds module enables and improves effective employee engagement.
You can create groups, view & wish birthdays & work anniversaries, and read more about what is happening in your organization. You can also post things to buy/ sell/ or rent. You can create posts about your organization, appreciation, and product updates.
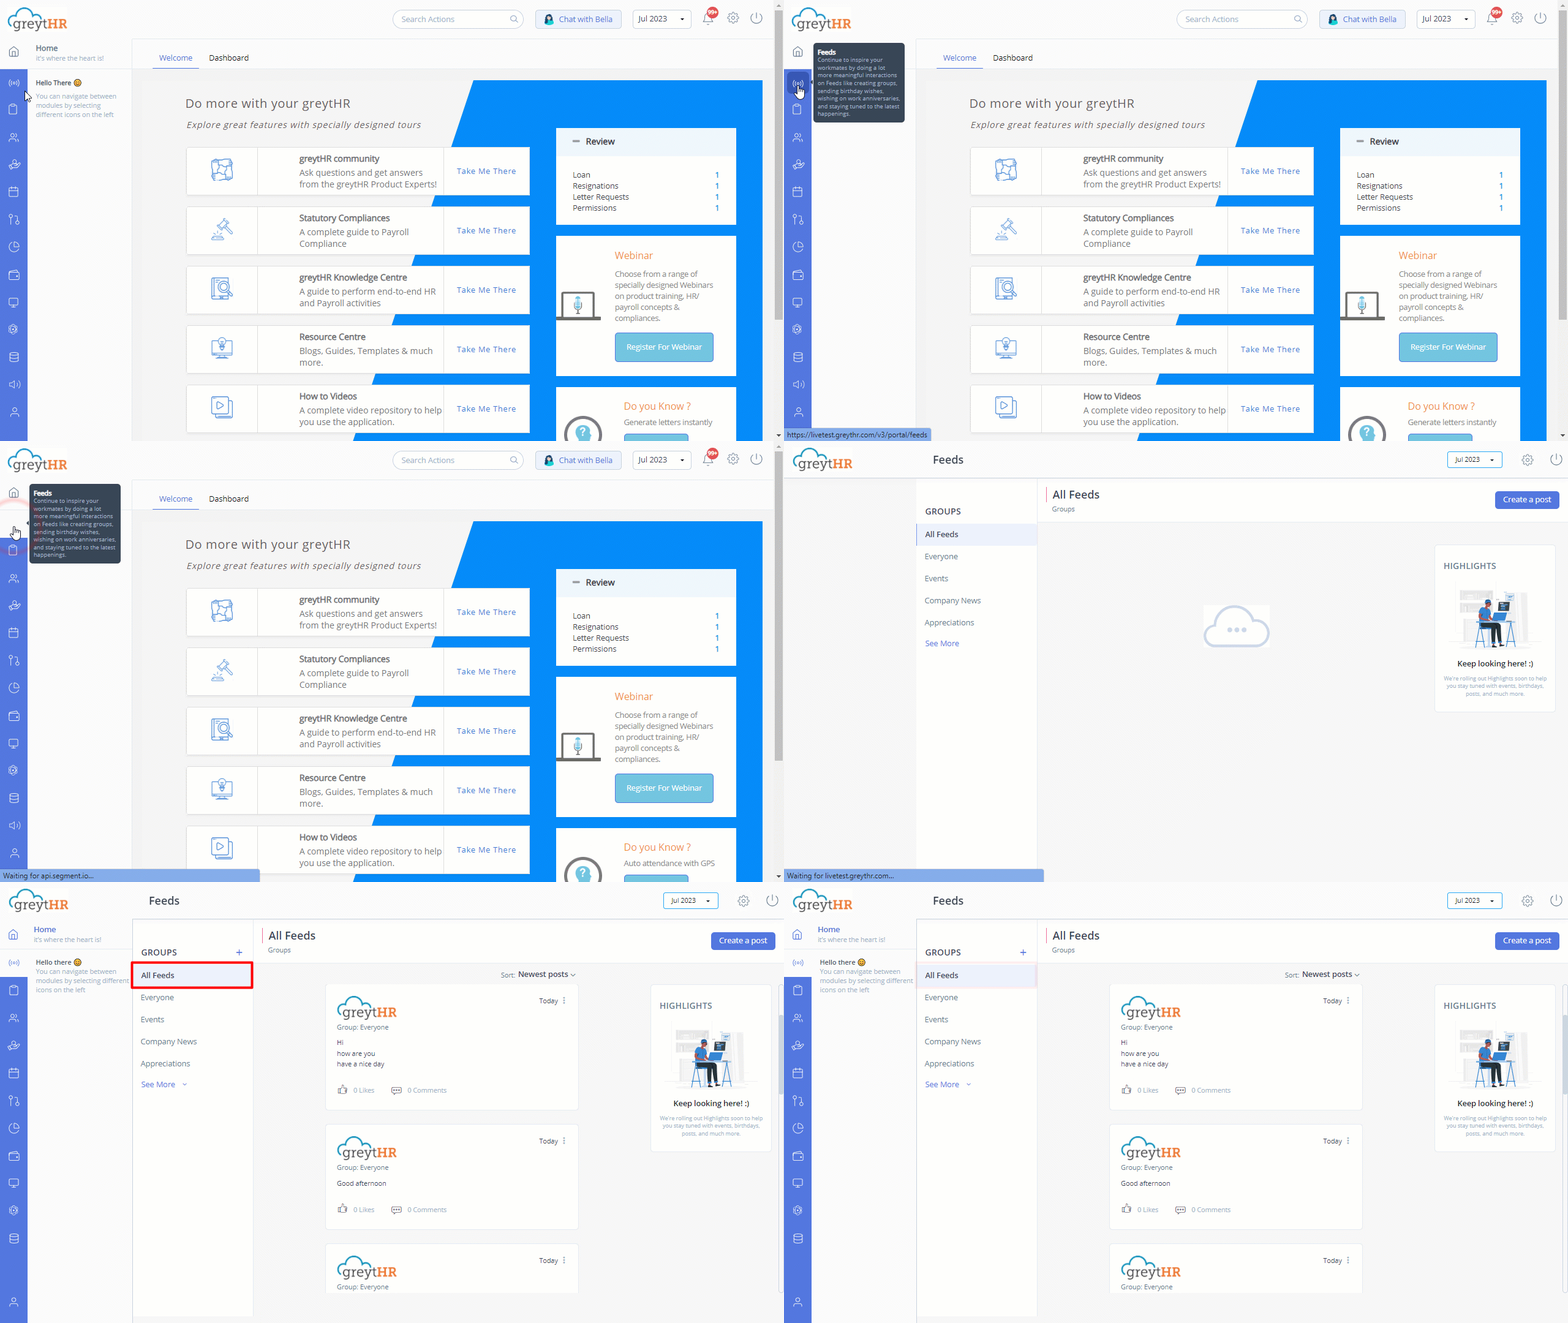
To view the Feeds page, click Feeds.

On the Feeds page, you can perform the following actions:
Create a group.
View posts in different groups.
Create a post.
Comment on posts.
Like a post.
Create a group
You can create a specific group for employees from the Feeds page. You can add selected employees to a group. The comments posted in each group are visible only to the members of that particular group. The visibility of posts depends on the privacy settings you configured while creating the group.
To create a group, perform the following actions:
On the Feeds page, next to the GROUPS section, click + sign to create a new group. The Feeds Group page opens and displays a list of the groups created in the Feeds section. You can disable, edit, and delete a group from this page. You can view the number of members in each group and the status of each group as Public/Private.
Click Add Group to create a new group. Add Feeds Group page opens.
Under the Group Name text box, enter a name for the new group you want to create.
Select the Public/Private options as per your requirements.
Public: If you want to create a group where all the employees can view the posts of the group, perform the following actions:
Select the Public option.
Click Create Group to create the group. A success message appears.
Private: If you want to create a group where selected employees can view the posts of the group, perform the following actions:
Select the Private option. A list of employees displays.
Click the Selected employees option.
Select the employees using the check box adjacent to the employee name.
Click the > arrow to move the selected employees to the right box. Moving the employees' names to the right side box confirms the list of employees you want to add to the group.
Note: You can use the Employee Filter option to select a particular category of employees.
Click Create Group to create the group with the selected employees. A success message appears.
View posts in different groups
The Feeds page displays posts under various groups. The admin creates these groups in your organization. To view a post under a particular group, perform the following actions:
On the Feeds page, under the Groups section, click the required group. The page displays all the posts available under the selected group.
Create a post
Each post displays the date on which it was posted, the group name, the message, number of likes, attachments, and number of comments. Each post also allows you to delete it using the Kebab menu (⁝).
To create a post on the Feeds page, perform the following actions:
On the Feeds page, click Create a post. The Create a post pop-up window appears.
From the You are posting in: dropdown list, select the group for which you want to create a post.
In the Write something here text box, write the post.
Click Attachment to attach an image or document to your post. Browse to the required and click Open.
Note: We recommend you read the See Posting Guidelines.
Click Post to create a post under the selected group.
Comment on posts
To comment on a post, perform the following actions:
On the Feeds page, select a post for which you want to add a comment.
Click the Comments icon available on the post. Post your comments here text box appears.
In the Post your comments here text box, enter the content you want to post as a comment.
Click Post Comment to post the comment. Your comment is now posted.
To delete a comment that you posted, perform the following actions:
The Delete icon is available under the comment you posted. Click the Delete icon. Delete Comment pop-up appears.
Click Confirm to delete the comment you posted.
Note: You can also view your colleagues' comments by clicking Comments. The number on the icon indicates the total number of comments for that particular post.
Like a post
To like a post, perform the following actions:
On the Feeds page, choose a post that you enjoyed.
Click the Thumbsup icon on the selected post to like the post.
Note: You can remove your like from a post by clicking the Thumbsup icon again. Click the Likes text to view a list of your colleagues who have liked the post. The number on the icon indicates the total number of likes for that particular post.
Other related links:
Was this article helpful?
More resources:
▶ Video - Watch our how-to videos to learn more about greytHR.
❓ FAQs - Solve your queries using FAQs.
📢 Product Update - Read about the product updates.